| Wednesday, July 26, 2006 |
| Tips for Modifying Bosomy Tank |
I'm really sorry I don't have time to figure out the whole pattern for different sizes, but since it is a free pattern I hope y'all will forgive me :) That said, here are a couple tips for changing the fit a bit if you're a larger or smaller girl.
The proportions of the top are pretty simple, so if you need the top to be wider or narrower, just cast on the number of stitches you need according to your gauge and make sure shaping stays centred.
Ex. You want a smaller top and cast on 95 stitches. The centre panel is 31 stitches, and must be in the middle. So 95-31 =64 stitches left. 64/2 = 32 stitches on either side. You will end up with 79 stitches at the top, and to be cast on for the top front. The bust shaping is done 1/3 in from either side, so 79/3 = about 26. Place the markers for bust shaping 26 stitches from the side. Make sense?
Bust Shaping
The pattern fits a D-cup. With the shaping as it is, there is a 6 inch (15cm) difference between the rib cage and bustline. Since each round of increases adds almost and inch, you can do as many rounds as you think you need. 1-2 rounds for an A-cup, probably 3 or 4 for a B, 5 or 6 for a C. Adjust bust decreases to match, ie if you did 4 rounds of increases, do 4 round of decreases. It's that simple.
Hopefully this will help any who want to fiddle a bit, please please please let me know if you make this, and if you need help! I have no real world knitting friends! Only you! (Don't you feel sorry for me now?? lol)
But most importantly, show off those bosoms girls! ;D
  Labels: Knitting, Patterns |
posted by tatjana @ 4:46 p.m.   |
|
|
|
| Monday, July 24, 2006 |
| Pattern for Bosomy Tank |
Phew. It's amazing how long it takes to explain simple things. This pattern looks a bit long, but is actually simple to make. The only tricky bit is that there is usually shaping on the front and side at the same time, which is why I exlained it row by row, which takes a lot of space. I hope it makes sense to most people, and that a few actually knit it and have a nice bosomy tank that makes the girls look nice n perky! I still have to check on where I can put files online so I can post this pattern and Lizzie as pdf files (this is more convenient I think?), but feel free to leave a comment with your addy or mail me at tatjana dot schulz at gmail dot com and I can send you the pattern as a word or pdf file. I will also post again with suggestions as to where to make changes for bigger and smaller girls and bosoms :)
*** OOPS!!! If you have already copied/saved this pattern, do so again because I noticed a mistake that I have changed. (It is marked in BOLD.)***
Bosomy Tank
Need:
3 mm (~US 3) needles
Approx. 250g or 630m of sportweight cotton yarn
Gauge:
27 stitches and 18 rows for a 10cm (4 inch) square or about 7 stitches per inch
(and in case it helps the yarn I used was 14 wraps per inch)
**If using cotton yarn, knit & wash a test swatch. Shrinkage sucks.**
Tank is knit in 3 pieces, 1 for the back, 2 for the front. If you want to knit the front as 1 piece, just follow the pattern for the top piece when finished the bottom instead of casting off.
Top length = 59cm/23.5 inches from shoulder to hem
Top width = 38cm/15 inches across hips and about the same around the bust when laid flat, but stretches to fit my 39" (98cm) hips.
Front Bottom
Cast on 115 stitches. Knit a border in 2x2 rib (knit 2, purl2) for 5 rows.
Knit 42 stitches, knit Panel Pattern, knit 42 stitches. Continue the body in stockinette, knitting the Panel Pattern in the centre.
On Row 15 (or about 2 inches/5cm from ribbing, on a RIGHT side row) begin side shaping:
At beginning of row, k1, then k2tog. For last 3 stitches of row, ssk, k1.
Repeat shaping 7 times on every 4th row.
Panel Pattern
Row 1 - yo, k2tog, k27, ssk, yo
Row 2 and all even rows - purl
Row 3 - yo, k1, k2tog, k25, ssk, k1, yo
Row 5 - yo, k2, k2tog, k23, ssk, k2, yo
Row 7 - yo, k3, k2tog, k21, ssk, k3, yo
Row 9 - yo, k4, k2tog, k19, ssk, k4, yo
Row 11 - yo, k5, k2tog, k17, ssk, k5, yo
Row 13 - yo, k6, k2tog, k15, ssk, k6, yo
Row 15 - yo, k7, k2tog, k13, ssk, k7, yo
Row 17 - yo, k8, k2tog, k11, ssk, k8, yo
Row 19 - yo, k9, k2tog, k9, ssk, k9, yo
Row 21 - yo, k10, k2tog, k7, ssk, k10, yo
Row 23 - yo, k11, k2tog, k5, ssk, k11, yo
Row 25 - yo, k12, k2tog, k3, ssk, k12, yo
Row 27 - yo, k13, sl2-k1-psso, k3, ssk, k12, yo
Repeat panel twice, and knit a third repeat up to Row 21 for the length shown here.
If you need it longer in the torso, knit it longer *after* the waist shaping, and if you need it to cover more of the hip to butt area, knit more rows before you start the waist shaping.
Ssk = slip 2 stitches, one after the other, as if to knit, then knit them together (left leaning decrease)
Sl2-k1-psso = slip 2 stitches as if to knit, knit one, pass 2 slipped stitches over stitch just knitted (centred, non-leaning double decrease, ie, 3 stitches made into 1)
Front Top
Cast on 99 stitches.
Knit in stockinette stitch. On first row, put marker 33rd stitch and 66th stitch.
Starting with row 4, work side and bust shaping at the same time:
Bust Increases
Knit 1, make 1 right (see a video of this here), knit to stitch with marker, make 1 right, knit marker stitch, make 1 right again. You will have increased one stitch on each side of the stitch with the marker. Continue knitting to the second marker, and again make 1 right before and after the marker. Knit to the last stitch, then make 1 right, knit 1. Repeat this shaping 6 times on every 4th row.
After the increases (141 stitches), knit 5 rows in stockinette before starting the bust decreases.
Bust Decreases
These are worked at the same time as the shaping for the armhole and neckline.
Row 1 – Bind off 4, knit to 1 stitch before marker, sl2-k1-psso, transferring the marker to the new stitch. (You now have 1 stitch where you had 3 before). Knit 25.
Instead of knitting the rest of the row, you will turn the work and start working the next row to create the split for the neckline. Continue working on the right half only and knit the other side later.
Row 2 – Purl.
Row 3 – Bind off 4, knit to 1 stitch before marker, sl2-k1-psso. Knit to last 2 stitches, k2tog.
Row 4 – Purl.
Row 5 – Bind off 3, knit to 1 stitch before marker, sl2-k1-psso. Knit to last 2 stitches, k2tog.
Row 6 – Purl
Repeat rows 5 and 6 once more.
Row 9 – Knit 1, ssk, knit to 1 stitch before marker, sl2-k1-psso. Knit to last 2 stitches, k2tog.
Row 10 - Purl
Repeat rows 9 & 10, 3 more times. There should be 30 stitches on the needle.
Continue knitting in stockinette, decreasing 1 on each side on every right side row until there are 14 stitches on the needle. Knit strap for another 12.5 inches (32cm).
Left side
Row 1 – Knit to 1 stitch before marker, sl2-k1-psso, transferring the marker to the new stitch. Knit to end.
Row 2 – Bind off 4, purl to last 2 stitches, p2tog.
Repeat rows 1 and 2 once more.
Row 5 - Knit to 1 stitch before marker, sl2-k1-psso, transferring the marker to the new stitch. Knit to end.
Row 6 – Bind off 3, purl to last 2 stitches, p2tog.
Repeat rows 5 and 6 once more.
Row 9 - Knit to 1 stitch before marker, sl2-k1-psso, transferring the marker to the new stitch. Knit to last 2 stitches, k2tog.
Row 10 - Purl to last 2 stitches, p2tog.
Repeat rows 9 & 10, 3 more times. There should be 30 stitches on the needle.
Continue knitting in stockinette, decreasing 1 on each side on every right side row until there are 14 stitches on the needle. Knit strap for another 12.5 inches (32cm).
Back
Cast on 115 stitches. Knit in 2 x 2 rib for 14 inches (36cm). Cast off.
Sew front pieces together before sewing front to back. The back will look smaller than the front because of the ribbing, but it will stretch out to match when you put the top on. Sew strap end to back.
Tips for modifying the tank according to boob size are here.
 Labels: Knitting, Patterns |
| posted by tatjana @ 8:39 p.m. |
|
|
|
| Friday, July 21, 2006 |
| I am SO mature... |
I can't stop giggling. It's terrible. Embarassing really. I am responsible for looking over the abstracts for an upcoming conference here at the university, and I just recieved another one. And guess what's so funny? The author's name....Assman. Hahaha! Ok, it's not that funny, but it amused me.
  Labels: Randomness |
| posted by tatjana @ 11:13 a.m. |
|
|
|
| Thursday, July 20, 2006 |
| Curly Tank? |
I think the time has finally come for me to seriously consider blocking the hell out of one of my knits. I've never bothered to really do it before...maybe a couple times I laid it flat to dry and tugged on it a bit, but not real blocking. I know, I know, I'm a shamefully lazy knitter. A disgrace to my kind!
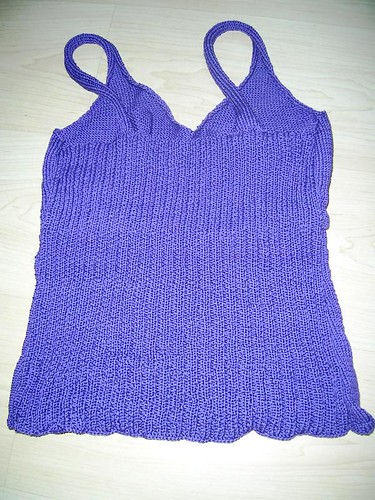
Really tho, I think it's the only thing I can do to get the curling out of the hem of this tank. I can only console myself that it's only happening in the front:
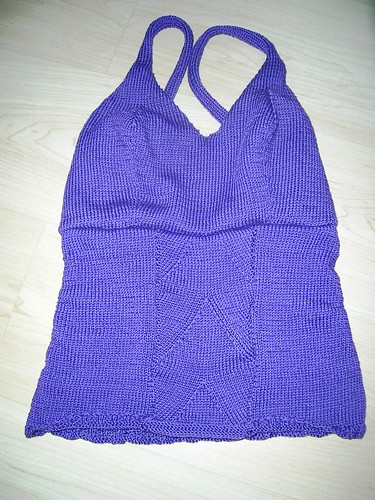
since I was making this up as I went along, and I could see that this yarn was not behaving knit up in stockinette, I devised a cunning plan....I knit the whole back in rib!! Oh, I'm so smart. That way I wouldn't have to worry about curling at the top or the bottom, and it gives a bit more interest to the top altogether. I like how it turned out :)
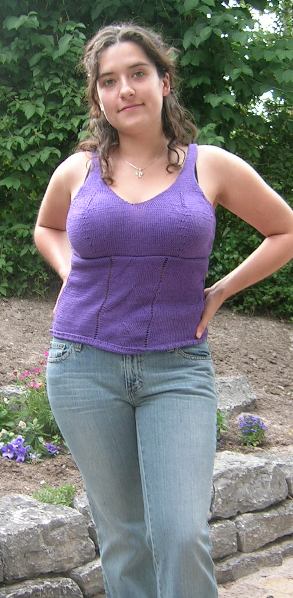
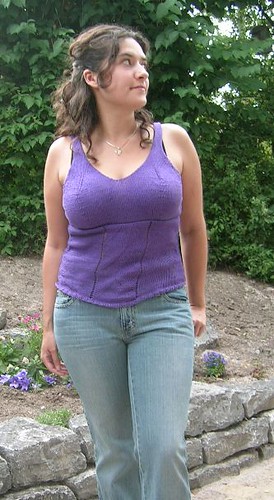 And this is how it looks on me. It fits perfectly and is very comfy. I had originally planned to make it with a higher neckline, a bit more modest you know, but somehow it just didn't work out that way because it was hard to tell what would fall where looking at the knit in progress in 2-D when the body it was to go on is very much 3-D. Oh well, c'est la vie. I will probably still wear it to work. Well, time to wash this sucker and see if I can straighten that curl out...but I will update on my sewing progress soon! And this is how it looks on me. It fits perfectly and is very comfy. I had originally planned to make it with a higher neckline, a bit more modest you know, but somehow it just didn't work out that way because it was hard to tell what would fall where looking at the knit in progress in 2-D when the body it was to go on is very much 3-D. Oh well, c'est la vie. I will probably still wear it to work. Well, time to wash this sucker and see if I can straighten that curl out...but I will update on my sewing progress soon!
Labels: Knitting |
| posted by tatjana @ 7:23 p.m. |
|
|
|
| Thursday, July 13, 2006 |
| Look Ma! No seams! |
Well, actually there's one seam. But that's still pretty darn impressive. A dress with one seam. That's like making a full course dinner with only one pot or one pan. Since it's been a while since I've done much sewing, I thought this would be a nice warm up. The super-wikkid-awesome tutorial can be found here. As many wonderful things are, this was all inspired by a discussion on Craftster and you can see the various versions that have been made so far in this thread.

I made the first version using some magenta jersey I've been meaning to do something with. I really like the bold colour, and it's just a really soft, nicely draping fabric. It's such a comfortable dress. The only drawback is that I ran out of fabric and had to make the straps a bit shorter, so there's less to wrap with, but I'm pretty happy with it. I think I will have to add a trim to the bottom, or accesorize it with something to break up the colour somehow, because it's a little overwhelming, and it kinda makes my boobs look enormous. Being petite, I really try to play them down as much as I can, usually with all sorts of minimizing bras, but it can be tricky to wrap this in such a way that'll cover one of those. It'd have to be a strapless or nothing at all (which actually works in several styles, thanks to all the wrapping) but those are anything but minimizing, and uber-uncomfortable to boot.

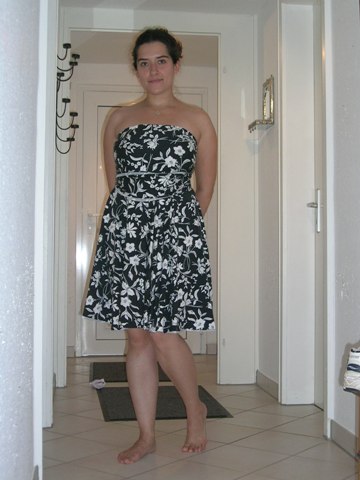
I also went out and bought a printed jersey, which I found on sale for only 2 euros/m!! I think it looks especially nice as a strapless dress, very 50s. This one turned out a touch shorter, which I like better, so I think I'll shorten the first one. I will also take the time to hem most or all of the edges on this one, since it tends to curl forward and show the plain white on the wrong side of the fabric.
This weekend I will begin the struggle with the German pattern magazines. If you've ever bought a Burda magazine, then you've seen the puzzle of overlapping patterns which you're supposed to trace onto butcher paper and then cut out. These sheets make those look easy! Really, this has to be seen to be believed, I'll be sure to take pictures. Wish me luck though, k?
 Labels: Sewing |
| posted by tatjana @ 11:41 p.m. |
|
|
|
| Tuesday, July 11, 2006 |
| Retro Chic |
I guess it's pretty obvious that since I signed up for Sew Retro and committed to sewing my very own vintage masterpiece, I'd better do a bit more than just put the button on my sidebar ;) I remember having a few nice retro patterns in my collection, back in my hardcore sewing day, but what's left of my beloved patterns has been left with my mum back in Canada and has apparently moved to a more spacious storage locale known as my brother's basement. I really have no idea how much is left of the pattern and fabric stockpile, and at any rate I can't get to it from here, so I decided that entitles me to some stash enhancement. Woohoo!
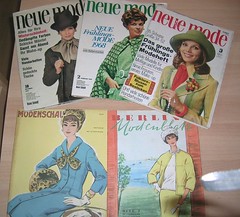
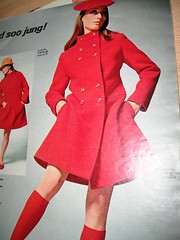
Here are some fun finds from Germany eBay!! Vintage pattern magazines! They are much like the Burda magazines of today. Actually, there are probably vintage Burdas somewhere, as it's been around forever, but no luck finding any this time. Anyhoo, after looking through them I was quite enamoured with this lovely coat circa 1972:
And who could resist these lovely short suits?? Hey! Shorts are even in again! We'll ignore the fact that in a pair of shorts I'm about as sexy as a certain lactating farm animal, and that I'd never have the patience to execute the perfect pleats required for these particular shorts. We'll just think about how darn cute they look on this adorably moon-eyed 70s model.
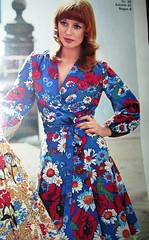 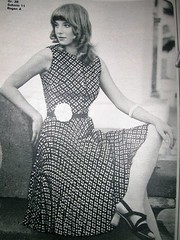
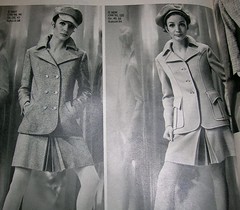
And these are the 2 dresses that I'm deciding between to make this month. I've been wanting to make a wrap dress, but I also want to use the pretty vintage sheets and things I've been collecting, and the cotton would not work with the sleeves on the wrap dress. But I could change the sleeves, or leave them off altogether. The sleeveless dress is very pretty, but I'm unsure about the buttons. I tend to stay away from things with buttons because I have trouble keeping the ladies (read boobs) under control and don't like giving my boss a flash of my bra through the scandalous gaps between my buttonholes. Of course, sewing it myself I can always adjust the pattern, but do I don't want to go to all that trouble (read I'm a lazy sod) unless I really want that dress. Maybe I'll just go post the dresses on the Sew Retro blog n see what they think.
  Labels: Sewing |
| posted by tatjana @ 10:48 p.m. |
|
|
|
| Sunday, July 09, 2006 |
| My Boobholder is CURLING!!! |
ARRRGGHH!! That's so irritating. I was looking at a tank top not too long ago, and thought I liked the shape of it, but not the stitch pattern. So I started making something similar, and the top boob-holding part is turning out great, but then i started on the body, which is a separate piece, and I didn't knit enough rows of garter stitch before continuing with the rest, which is predominantly stockinette and the damn thing is curling like it thinks it's Canadian. (Sweep! Sweep!) It's only a couple inches though, so I think I will just frog it and maybe try a rib border instead. Hopefully it'll behave then. Once I've got enough knit to actually see the pattern that runs down the centre I'll post a progress shot.
Labels: Knitting |
| posted by tatjana @ 5:40 p.m. |
|
|
|
| Tuesday, July 04, 2006 |
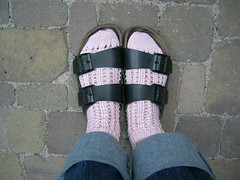
| Birkenstocks + socks = SEXY! |
Yeah Baby! You just can't resist can you? That lovely, delicate pink lace, paired with good German practicality! It's what every man dreams of ;)
So here they are, my very first pair of socks! The Simply Lovely Lace Socks from Interweave Spring 2006. What the heck took me so long? I put it off for a long time, because I just wasn't prepared to deal with the DPNs. I made a hat once long ago, and they just seemed to me to be some odd form of handicraft torture, and not like the usual relaxing experience that I usually expect my knitting to be. So I found me some tips on how to knit with 2 circs instead, and before I knew it I was cruisin! These were so fun and simple to make, and they're just so darn purdy, I can't help but be pleased with myself :) And they turned out just fine with some regular cotton yarn I had lying around, which seemed to me to be better suited for lacy summer socks. I can't wait to make another pair!
Labels: Knitting |
| posted by tatjana @ 12:08 p.m. |
|
|
|
|
|


