| Saturday, June 17, 2006 |
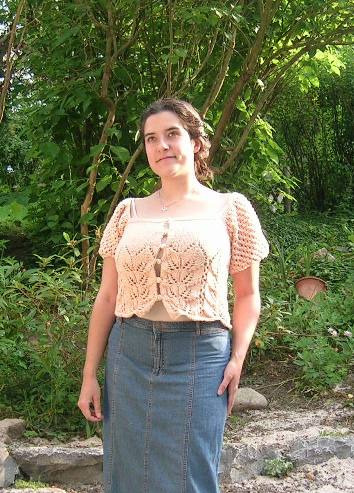
| Finally! Lizzie Pattern |
First, a warning. I didn't take very detailed notes while making this, and has to write up the pattern from what I remembered and what I could see from the cardigan itself, so the pattern may be a little off. But I'm perfectly happy to help those having trouble if there's an error - leave a comment and I'll get back to you as soon as I can! Also, I'm still knitting this up again with a lighter weight cotton. But for this one I've decided to make it a closed top, and try to add a bit of shaping to it. This will be 'Lizzie Light' and I'll put up a pattern for that too once it's done.
I'm not so good at pattern writing, so I hope it's ok! Good luck n have fun!
Lizzie
You need:
4mm (US ) circular needle 80 or 100cm (32-40”)
4mm (US ) knitting needles (or just you the circular needle for the sleeves as well)
350g or 575m (640 yards) of DK weight cotton
Stitchholder or scrap yarn
Darning needle
Crochet hook (not needed if button loops done with i-cord or ribbon, etc.)
6 buttons
Gauge: 19 stitches x 25 rows for a 10x10cm (4 inch) square
Garment Measurements: about 90cm or 36 inches around and 45cm/18 inches in length from shoulder to hem
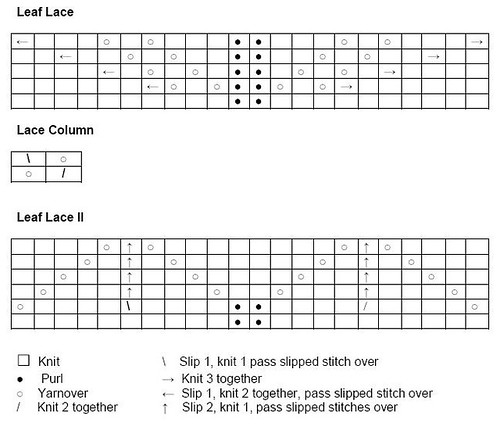
Cast on 168 stitches. Knit the first row. Begin leaf lace pattern. In each row, between each repeat of the leaf lace, knit the lace column. This is to separate the leaves so that they don’t blend together. After knitting 4 sets of the leaf lace + leaf column, knit one set of leaf lace II for the tops of the leaves. Do not continue the lace column, knit the stitches between each set of leaves. At the end of Leaf Lace II, knit 6 rows of stockinette and then separate the front and back of the cardigan – put 42 stitches for the left front and 84 stitches for the back on a stitchholder or a piece of scrap yarn before beginning the armhole decreases.
Armhole decreases
Working on the right front, there should be 42 stitches on the needle. On the right front, bind off 3 stitches. Continuing in stockinette, decrease one stitch at the beginning of every right side row using SSK. After 20 rows, knit 6 rows of garter stitch and bind off on a right side row. For the left front bind off 3 stitches and knit the same as right side. For armhole, decrease one at the end of every right side row, using K2tog. For the back of the cardigan, bind off 3 stitches on each side, and continue in stockinette. On every right side row, decrease one on the right with SSK, and one on the left with K2tog. As with the front, knit 10 rows with decreases in stockinette, then knit 6 rows in garter stitch (no decreases).
Sleeves
Cast on 48 stitches.
Rows 1-4 1x1 rib = K1, P1 across the row
Row 5 Increase row – Knit into front and back of every stitch. (96 stitches)
Row 6 Begin Berry Lace pattern.
Continue lace pattern until sleeve measures 22cm (~9 inches). (This can be made a bit shorter if you prefer more of a cap sleeve, or made longer, up to a ¾ length sleeve. If you want to make a full length sleeve, you will have to make the opening a bit smaller.)
Decrease Row – K2tog across entire row. There should 48 stitches again.
Knit 6 rows of garter stitch and bind off.
Berry Lace
Row 1 – K1 *in the same stitch K1-YO-K1; P3tog* repeat * K1
Row 2 and 4 – Knit all stitches
Row 3 – K1 *P3tog, in the same stitch K1-YO-K1* repeat * K1
Seaming together
Before sewing the sleeves to the body, sew a portion of the sides together. Folding each sleeve in half lengthwise, sew along the sides starting at the bottom (rib border) and continuing for about 10cm (4 inches). This is the portion shown in blue on the diagram. To attach the sleeves to the body, match up the garter stitch border at the tops of the sleeves with the garter stitch on the body, and sew the open portion of the sleeve to the decrease section of the body as shown in the diagram. The section of the sleeve which is sewn to the body should measure about 12.5cm (5 inches).
For the buttons, make 6 loops (or more if you wish) and attach them at regular intervals along the front left edge. (Mine are about 6.5cm or 2.5 inches apart.) These can be crocheted, in simple chain stitch, or I-cord, or with any kind of ribbon or trim. My buttons were about 11mm (a little less than ½ inch) wide, and my loops were about 2.5cm (~1 inch) long. Sew on the buttons to line match up with the loops.
Now you just weave in any remaining ends and you’re done!

  Labels: Knitting |
posted by tatjana @ 7:42 p.m.   |
|
| 4 Comments: |
-
Thanks for sharing. That is an incredibly beautiful sweater. You have done a great job with it.
Edit Comment
-
Thank you for sharing this. I think I have enough yarn of the right weight in my stash to give it a try. And it is so Lizzie appropriate.
Edit Comment
-
Thanks so much for your commetns and stopping by! I had so much fun with this project, hopefully it won't be long before I have more patterns :)
Edit Comment
-
Hi, just left a comment on Flickr, it's such a cute cardi !! You should have had it published somewhere, at least online !! I'm Wisting it !
Tahnks for sharing !!
Edit Comment
|
| |
| << Home |
| |
|
|


Thanks for sharing. That is an incredibly beautiful sweater. You have done a great job with it.
Edit Comment