| Wednesday, July 26, 2006 |
| Tips for Modifying Bosomy Tank |
I'm really sorry I don't have time to figure out the whole pattern for different sizes, but since it is a free pattern I hope y'all will forgive me :) That said, here are a couple tips for changing the fit a bit if you're a larger or smaller girl.
The proportions of the top are pretty simple, so if you need the top to be wider or narrower, just cast on the number of stitches you need according to your gauge and make sure shaping stays centred.
Ex. You want a smaller top and cast on 95 stitches. The centre panel is 31 stitches, and must be in the middle. So 95-31 =64 stitches left. 64/2 = 32 stitches on either side. You will end up with 79 stitches at the top, and to be cast on for the top front. The bust shaping is done 1/3 in from either side, so 79/3 = about 26. Place the markers for bust shaping 26 stitches from the side. Make sense?
Bust Shaping
The pattern fits a D-cup. With the shaping as it is, there is a 6 inch (15cm) difference between the rib cage and bustline. Since each round of increases adds almost and inch, you can do as many rounds as you think you need. 1-2 rounds for an A-cup, probably 3 or 4 for a B, 5 or 6 for a C. Adjust bust decreases to match, ie if you did 4 rounds of increases, do 4 round of decreases. It's that simple.
Hopefully this will help any who want to fiddle a bit, please please please let me know if you make this, and if you need help! I have no real world knitting friends! Only you! (Don't you feel sorry for me now?? lol)
But most importantly, show off those bosoms girls! ;D
  Labels: Knitting, Patterns |
posted by tatjana @ 4:46 p.m.   |
|
|
|
| Monday, July 24, 2006 |
| Pattern for Bosomy Tank |
Phew. It's amazing how long it takes to explain simple things. This pattern looks a bit long, but is actually simple to make. The only tricky bit is that there is usually shaping on the front and side at the same time, which is why I exlained it row by row, which takes a lot of space. I hope it makes sense to most people, and that a few actually knit it and have a nice bosomy tank that makes the girls look nice n perky! I still have to check on where I can put files online so I can post this pattern and Lizzie as pdf files (this is more convenient I think?), but feel free to leave a comment with your addy or mail me at tatjana dot schulz at gmail dot com and I can send you the pattern as a word or pdf file. I will also post again with suggestions as to where to make changes for bigger and smaller girls and bosoms :)
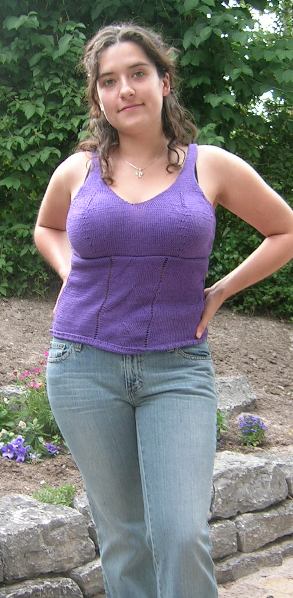
*** OOPS!!! If you have already copied/saved this pattern, do so again because I noticed a mistake that I have changed. (It is marked in BOLD.)***
Bosomy Tank
Need:
3 mm (~US 3) needles
Approx. 250g or 630m of sportweight cotton yarn
Gauge:
27 stitches and 18 rows for a 10cm (4 inch) square or about 7 stitches per inch
(and in case it helps the yarn I used was 14 wraps per inch)
**If using cotton yarn, knit & wash a test swatch. Shrinkage sucks.**
Tank is knit in 3 pieces, 1 for the back, 2 for the front. If you want to knit the front as 1 piece, just follow the pattern for the top piece when finished the bottom instead of casting off.
Top length = 59cm/23.5 inches from shoulder to hem
Top width = 38cm/15 inches across hips and about the same around the bust when laid flat, but stretches to fit my 39" (98cm) hips.
Front Bottom
Cast on 115 stitches. Knit a border in 2x2 rib (knit 2, purl2) for 5 rows.
Knit 42 stitches, knit Panel Pattern, knit 42 stitches. Continue the body in stockinette, knitting the Panel Pattern in the centre.
On Row 15 (or about 2 inches/5cm from ribbing, on a RIGHT side row) begin side shaping:
At beginning of row, k1, then k2tog. For last 3 stitches of row, ssk, k1.
Repeat shaping 7 times on every 4th row.
Panel Pattern
Row 1 - yo, k2tog, k27, ssk, yo
Row 2 and all even rows - purl
Row 3 - yo, k1, k2tog, k25, ssk, k1, yo
Row 5 - yo, k2, k2tog, k23, ssk, k2, yo
Row 7 - yo, k3, k2tog, k21, ssk, k3, yo
Row 9 - yo, k4, k2tog, k19, ssk, k4, yo
Row 11 - yo, k5, k2tog, k17, ssk, k5, yo
Row 13 - yo, k6, k2tog, k15, ssk, k6, yo
Row 15 - yo, k7, k2tog, k13, ssk, k7, yo
Row 17 - yo, k8, k2tog, k11, ssk, k8, yo
Row 19 - yo, k9, k2tog, k9, ssk, k9, yo
Row 21 - yo, k10, k2tog, k7, ssk, k10, yo
Row 23 - yo, k11, k2tog, k5, ssk, k11, yo
Row 25 - yo, k12, k2tog, k3, ssk, k12, yo
Row 27 - yo, k13, sl2-k1-psso, k3, ssk, k12, yo
Repeat panel twice, and knit a third repeat up to Row 21 for the length shown here.
If you need it longer in the torso, knit it longer *after* the waist shaping, and if you need it to cover more of the hip to butt area, knit more rows before you start the waist shaping.
Ssk = slip 2 stitches, one after the other, as if to knit, then knit them together (left leaning decrease)
Sl2-k1-psso = slip 2 stitches as if to knit, knit one, pass 2 slipped stitches over stitch just knitted (centred, non-leaning double decrease, ie, 3 stitches made into 1)
Front Top
Cast on 99 stitches.
Knit in stockinette stitch. On first row, put marker 33rd stitch and 66th stitch.
Starting with row 4, work side and bust shaping at the same time:
Bust Increases
Knit 1, make 1 right (see a video of this here), knit to stitch with marker, make 1 right, knit marker stitch, make 1 right again. You will have increased one stitch on each side of the stitch with the marker. Continue knitting to the second marker, and again make 1 right before and after the marker. Knit to the last stitch, then make 1 right, knit 1. Repeat this shaping 6 times on every 4th row.
After the increases (141 stitches), knit 5 rows in stockinette before starting the bust decreases.
Bust Decreases
These are worked at the same time as the shaping for the armhole and neckline.
Row 1 – Bind off 4, knit to 1 stitch before marker, sl2-k1-psso, transferring the marker to the new stitch. (You now have 1 stitch where you had 3 before). Knit 25.
Instead of knitting the rest of the row, you will turn the work and start working the next row to create the split for the neckline. Continue working on the right half only and knit the other side later.
Row 2 – Purl.
Row 3 – Bind off 4, knit to 1 stitch before marker, sl2-k1-psso. Knit to last 2 stitches, k2tog.
Row 4 – Purl.
Row 5 – Bind off 3, knit to 1 stitch before marker, sl2-k1-psso. Knit to last 2 stitches, k2tog.
Row 6 – Purl
Repeat rows 5 and 6 once more.
Row 9 – Knit 1, ssk, knit to 1 stitch before marker, sl2-k1-psso. Knit to last 2 stitches, k2tog.
Row 10 - Purl
Repeat rows 9 & 10, 3 more times. There should be 30 stitches on the needle.
Continue knitting in stockinette, decreasing 1 on each side on every right side row until there are 14 stitches on the needle. Knit strap for another 12.5 inches (32cm).
Left side
Row 1 – Knit to 1 stitch before marker, sl2-k1-psso, transferring the marker to the new stitch. Knit to end.
Row 2 – Bind off 4, purl to last 2 stitches, p2tog.
Repeat rows 1 and 2 once more.
Row 5 - Knit to 1 stitch before marker, sl2-k1-psso, transferring the marker to the new stitch. Knit to end.
Row 6 – Bind off 3, purl to last 2 stitches, p2tog.
Repeat rows 5 and 6 once more.
Row 9 - Knit to 1 stitch before marker, sl2-k1-psso, transferring the marker to the new stitch. Knit to last 2 stitches, k2tog.
Row 10 - Purl to last 2 stitches, p2tog.
Repeat rows 9 & 10, 3 more times. There should be 30 stitches on the needle.
Continue knitting in stockinette, decreasing 1 on each side on every right side row until there are 14 stitches on the needle. Knit strap for another 12.5 inches (32cm).
Back
Cast on 115 stitches. Knit in 2 x 2 rib for 14 inches (36cm). Cast off.
Sew front pieces together before sewing front to back. The back will look smaller than the front because of the ribbing, but it will stretch out to match when you put the top on. Sew strap end to back.
Tips for modifying the tank according to boob size are here.
 Labels: Knitting, Patterns |
| posted by tatjana @ 8:39 p.m. |
|
|
|
| Saturday, June 10, 2006 |
| Lizzie Cardi |
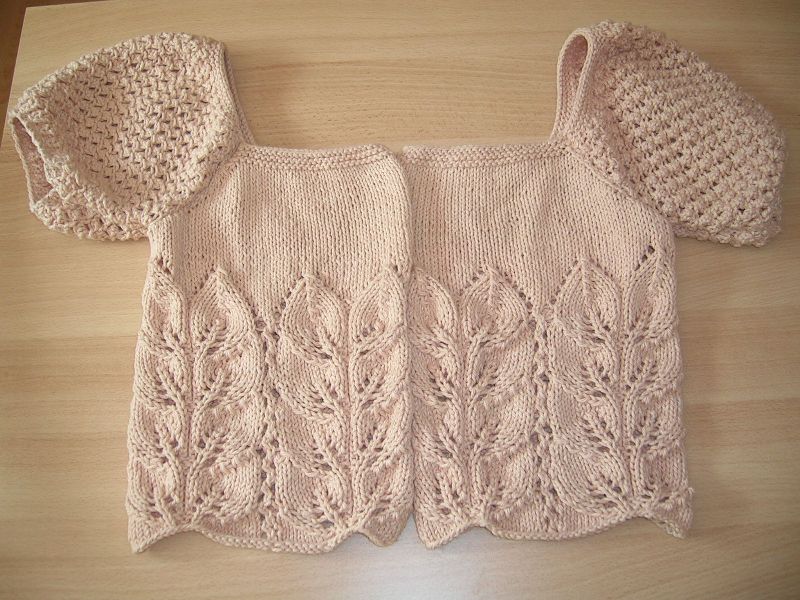
She stills needs some buttons, and I haven't decided if I want to add a bit of a crochet edge, or maybe just some ribbon facing, but other than that she's done. I've always been a fan of gathered sleeves and empire waisted things, and thought I could try and incorporate that into a cardi. Of all the things I've just made up, I like this one by far the best. It's not so much a cardi like I planned, it's become more top-lik, but it's still quite nice for covering up a bit when your tank top seems too naked.
The yarn is come basic cotton I've had in my stash for a while, which I think is meant to be used for dishcloths. I just though the colour was very fitting, so I went ahead and used it anyway. I knit it on 4mm needles (US 6, UK 8) from the bottom up in the round, separating the back and front when I got to the arm. The sleeves were knit separately and sewn on at the end. I found the leaf lace pattern on a tank top in one of my Rebecca magazines, and the sleeves are done in berry stitch. I will definitely make another one of these, especially since I have a bunch of cotton laying around from an ebay spree a while back. The other cotton I have is nicer, mercerised, and knits on 3mm needles, so it will make it look more delicate and polished, and even more like a top, since it'll be thinner. But that's ok. This was fun and easy to make, so while I'm making up the next one I think I'll put together the pattern for it so others can make a Lizzie too! Then we can all be super girlie together. Won't that be fun?
Labels: Knitting, Patterns, Randomness |
| posted by tatjana @ 10:46 p.m. |
|
|
|
|
|